| 银杏科技有限公司旗下技术文档发布平台 | |||
| 技术支持电话 | 0379-69926675-801 | ||
| 技术支持邮件 | Gingko@vip.163.com | ||
| 版本 | 日期 | 作者 | 修改内容 |
|---|---|---|---|
| V1.0 | 2020-07-03 | gingko | 初次建立 |
实验二十:NIOSII之UART串口通信实验
一、 实验目的与意义
- 了解UART接口模块的工作原理。
- 掌握UART接口模块的使用方法。
- 掌握QuartusII的使用方法。
二、 实验设备及平台
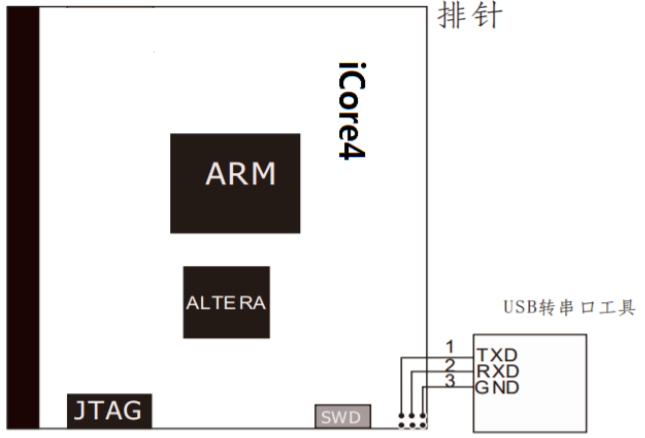
三、 硬件连接
四、 实验内容
一、硬件部分
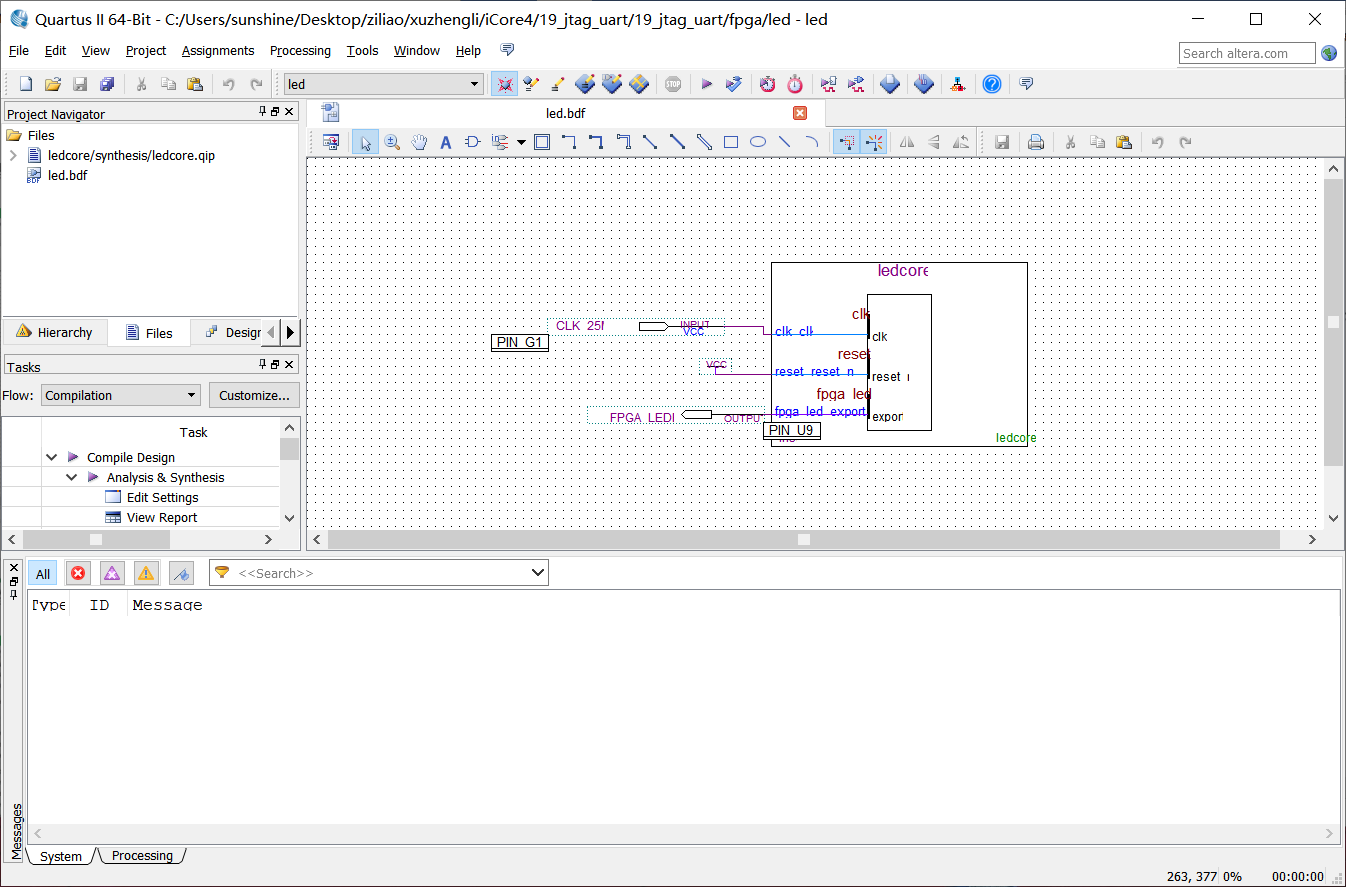
1、首先打开实验十八里面建立的工程(所有路径保持不变),如图所示:
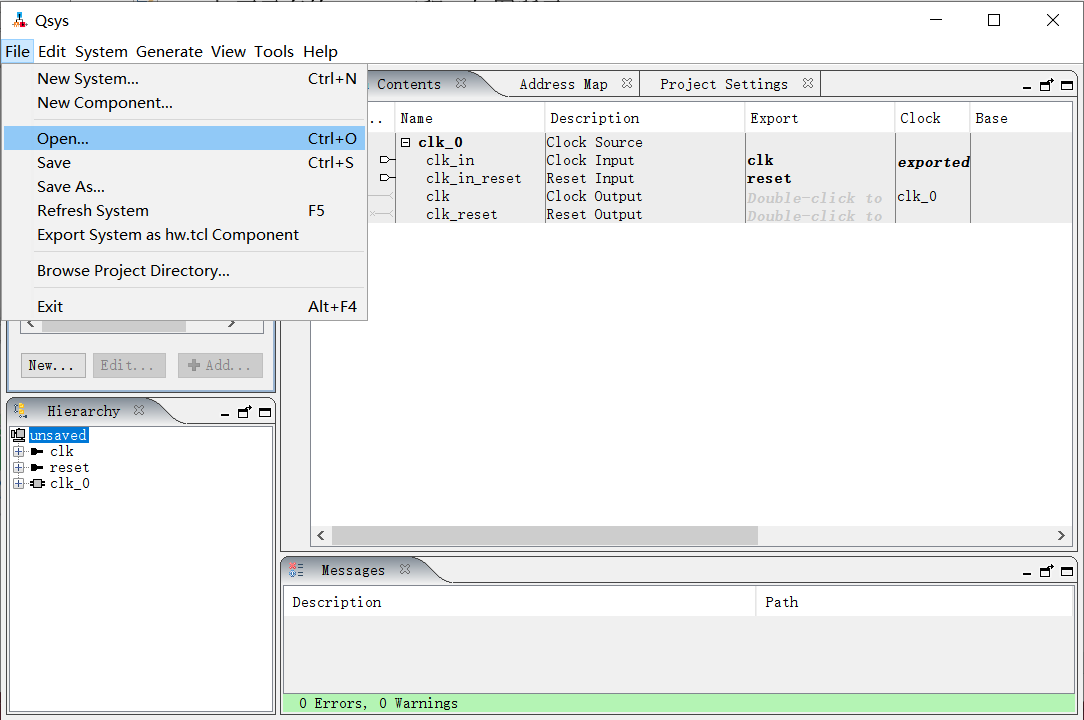
 2、下面添加UART接口模块,选择Tools→Qsys,如图所示:
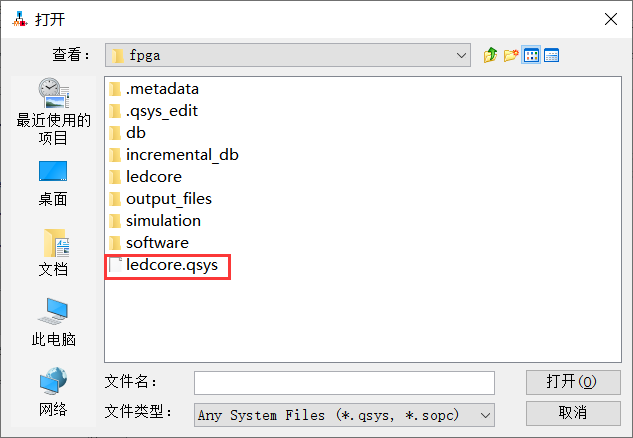
 3、打开已有的noisII工程,如图所示:
 4、进入后界面如图所示:
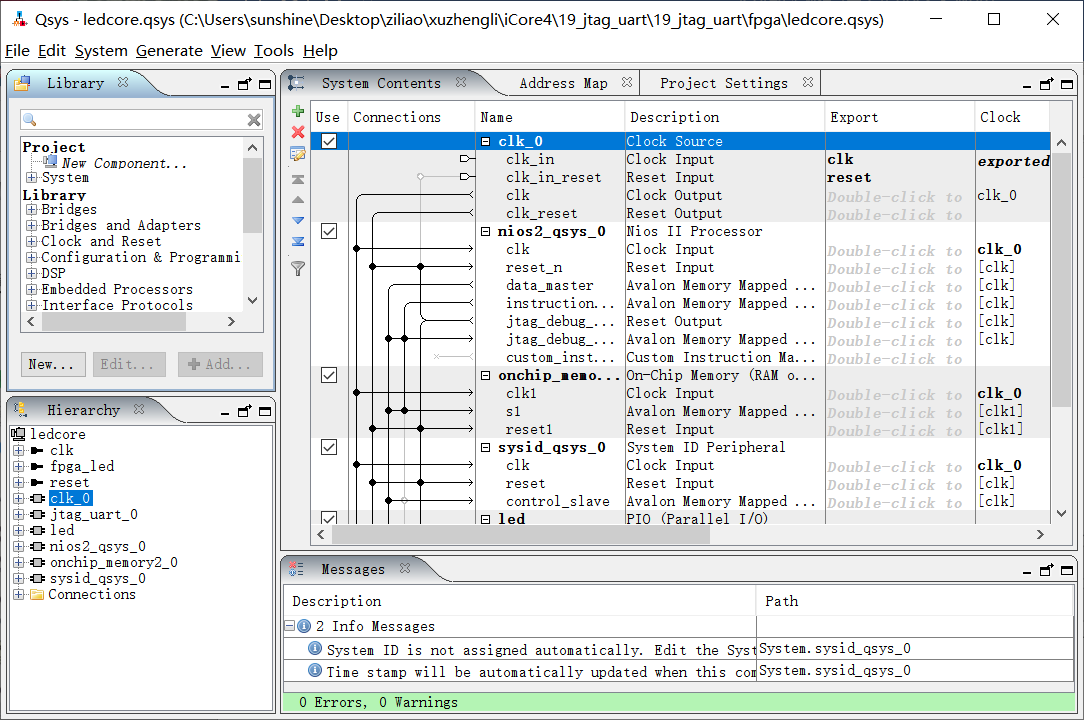 5、在界面左侧选择Interface Protocols→Serial→Serial→UART(RS-232 serial port),然后添加。
 6、在此界面参数设置如图所示,然后点击Finish:
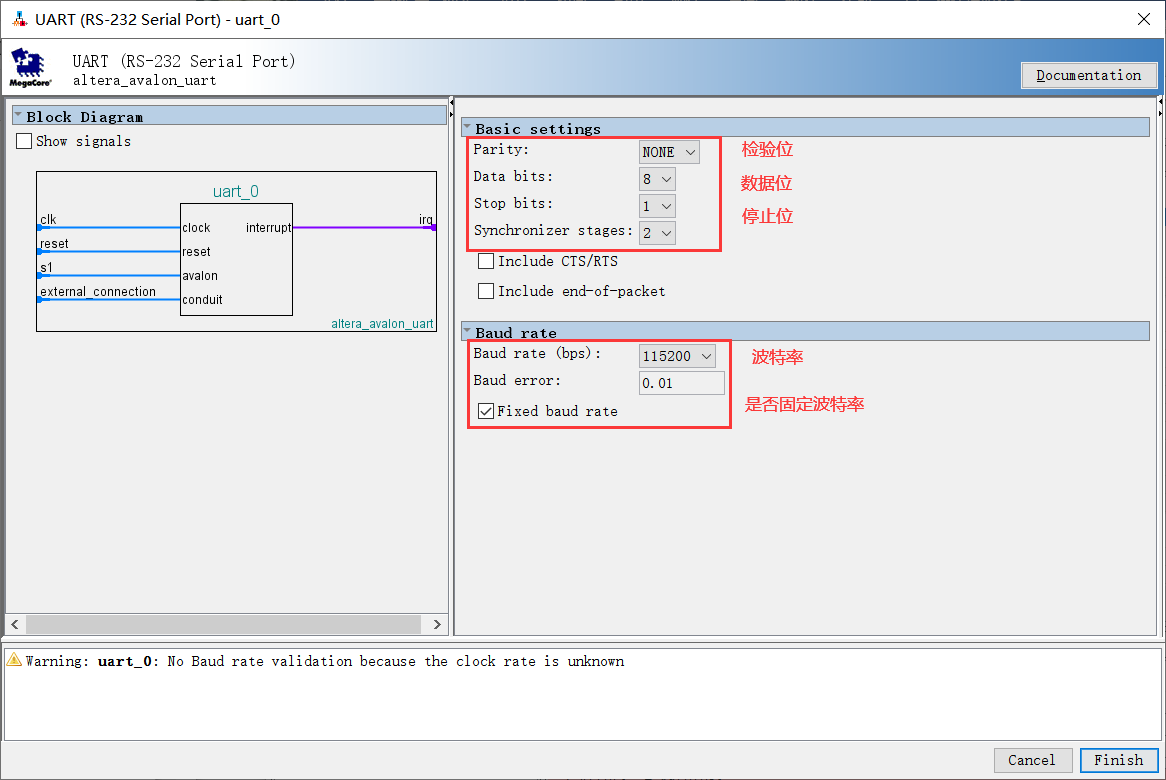 7、添加成功后界面如图所示:
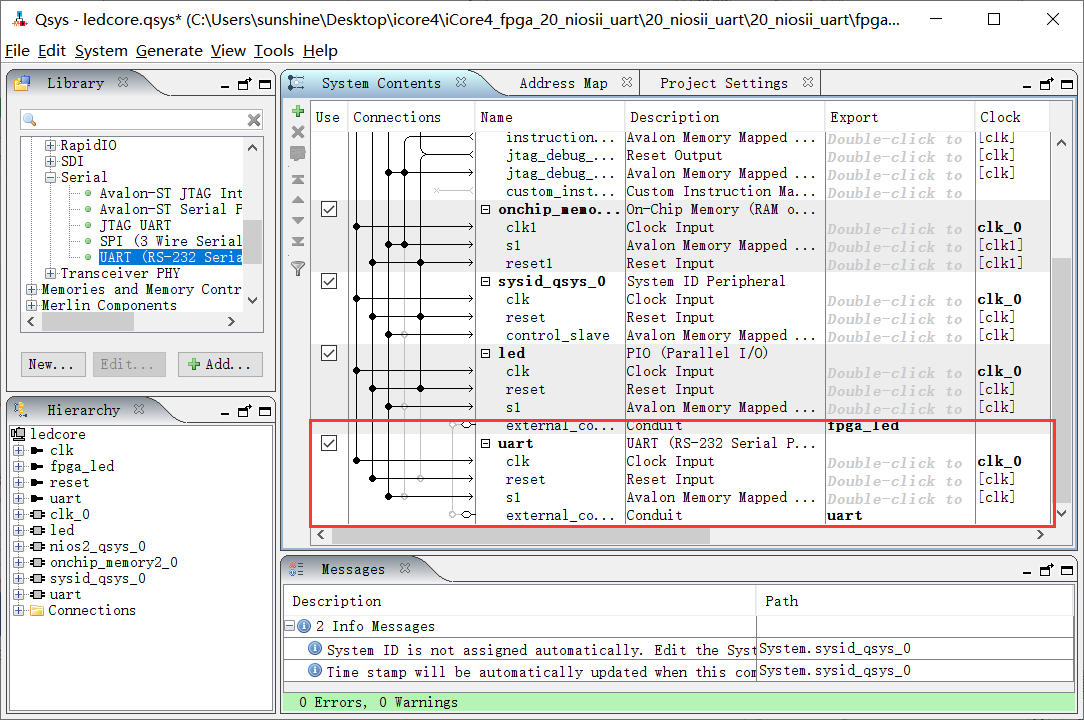 8、对uart模块进行重命名为uart,如图所示:
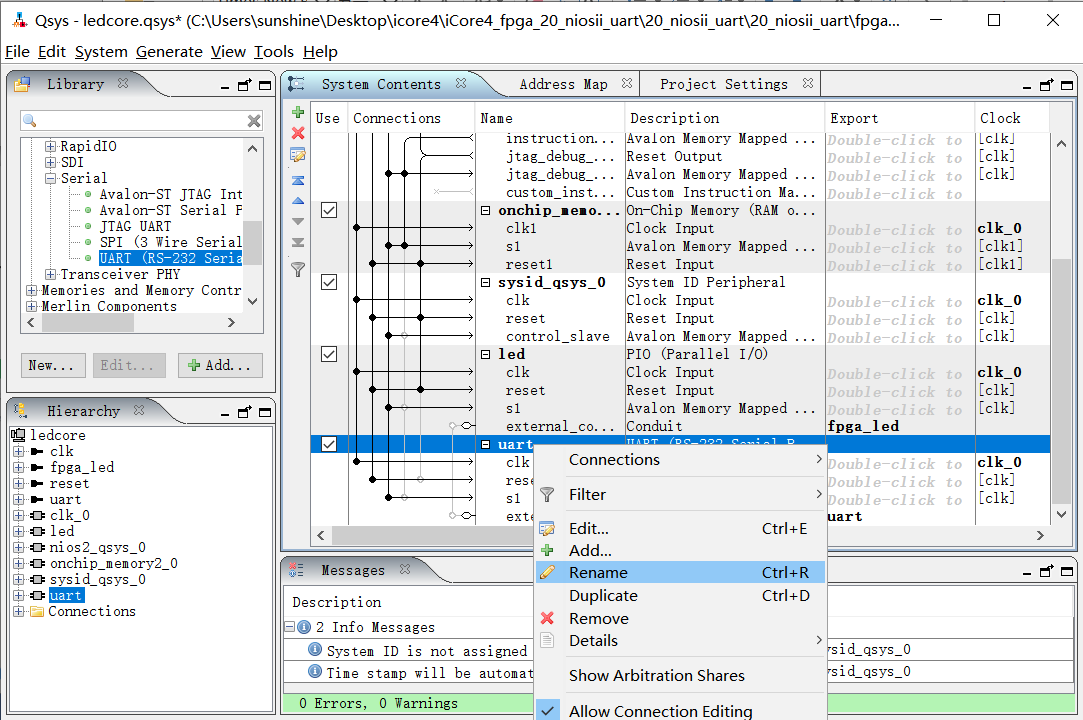 9、双击uart模块下面external_connection后面的Double-click to改为uart如图所示。
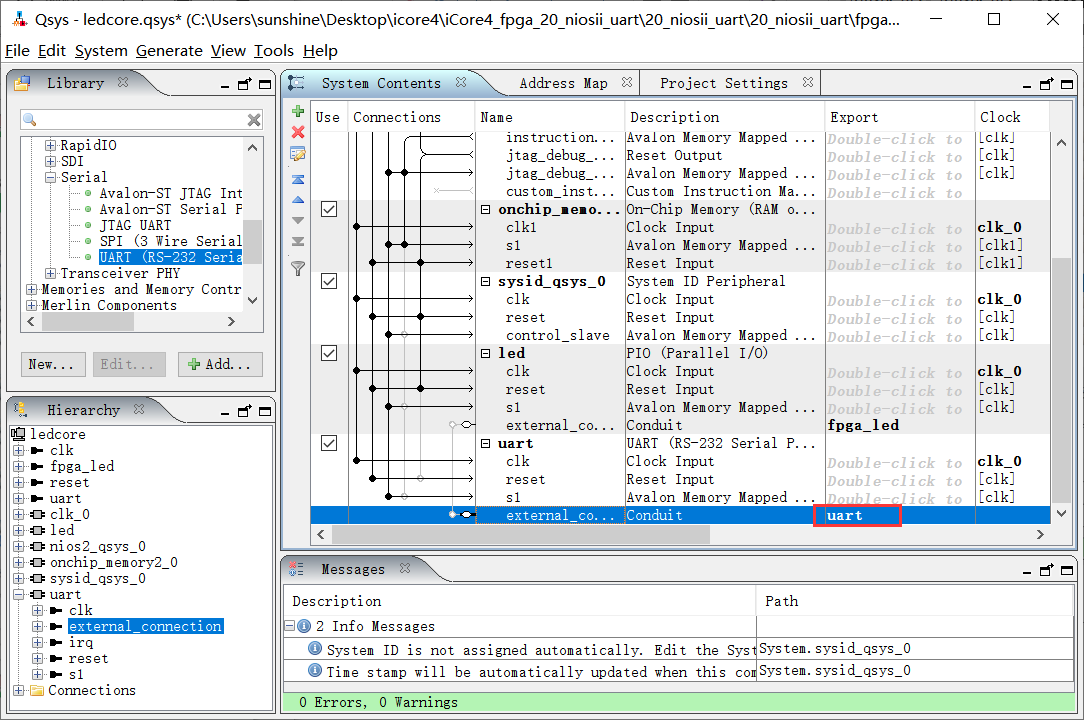 10、下面开始连接时钟线,右击uart下面的clk与clk_0连线:
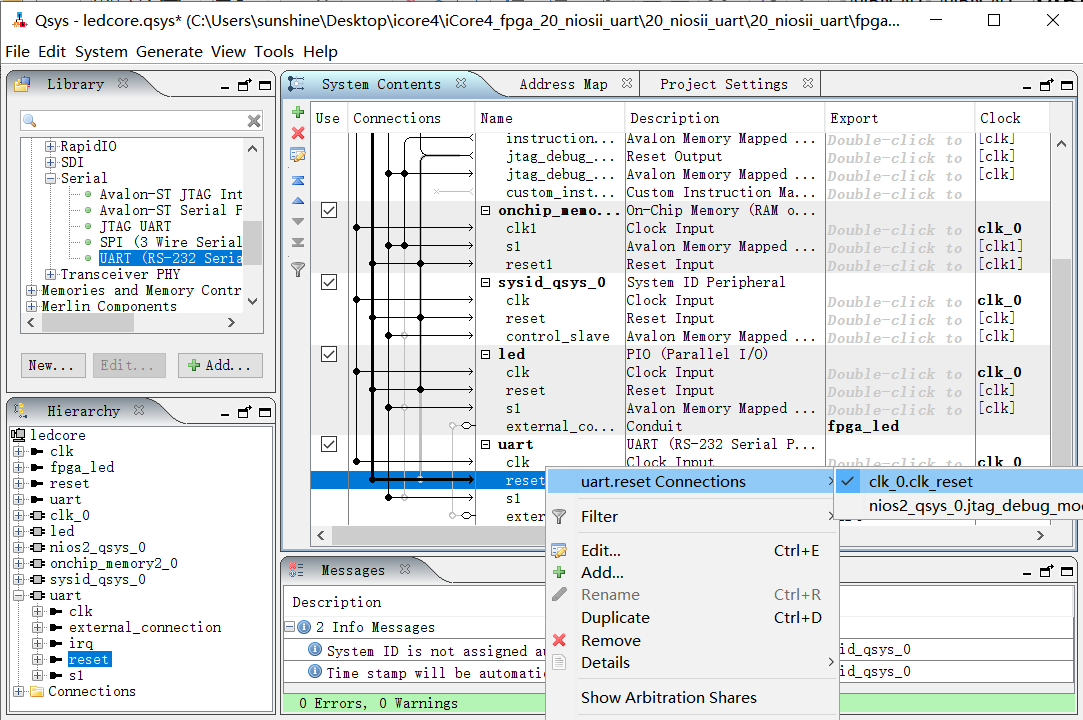
 11、连接复位线,如图所示。
 12、连接信号线s1,如图所示:
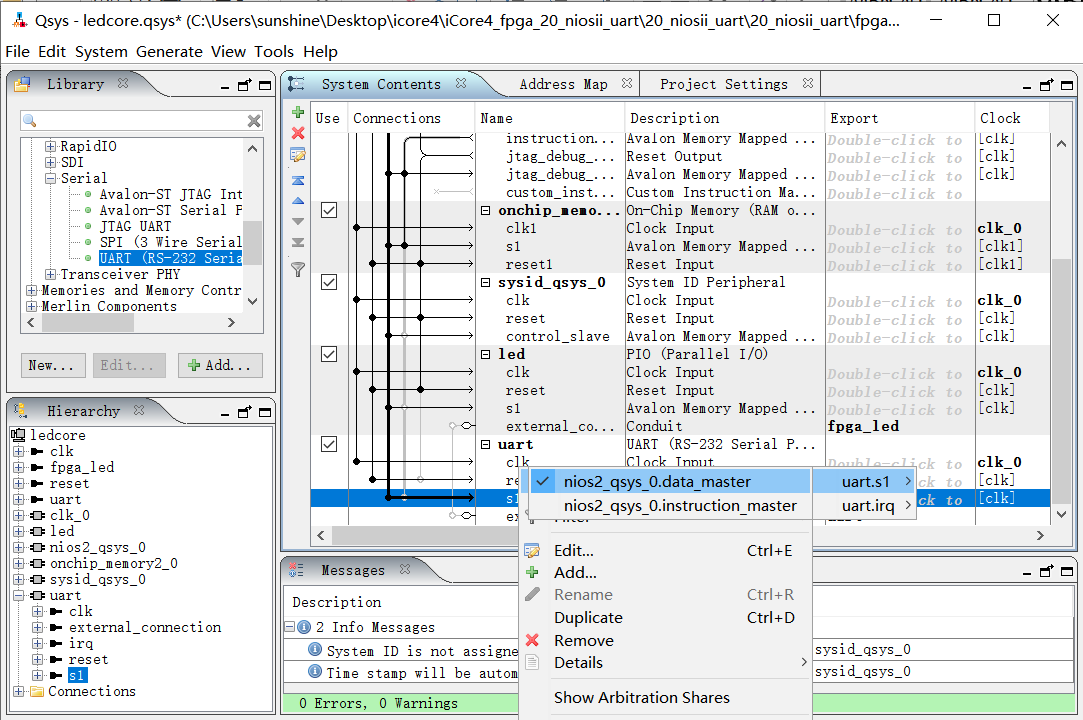 13、连接中断信号线,如图所示:
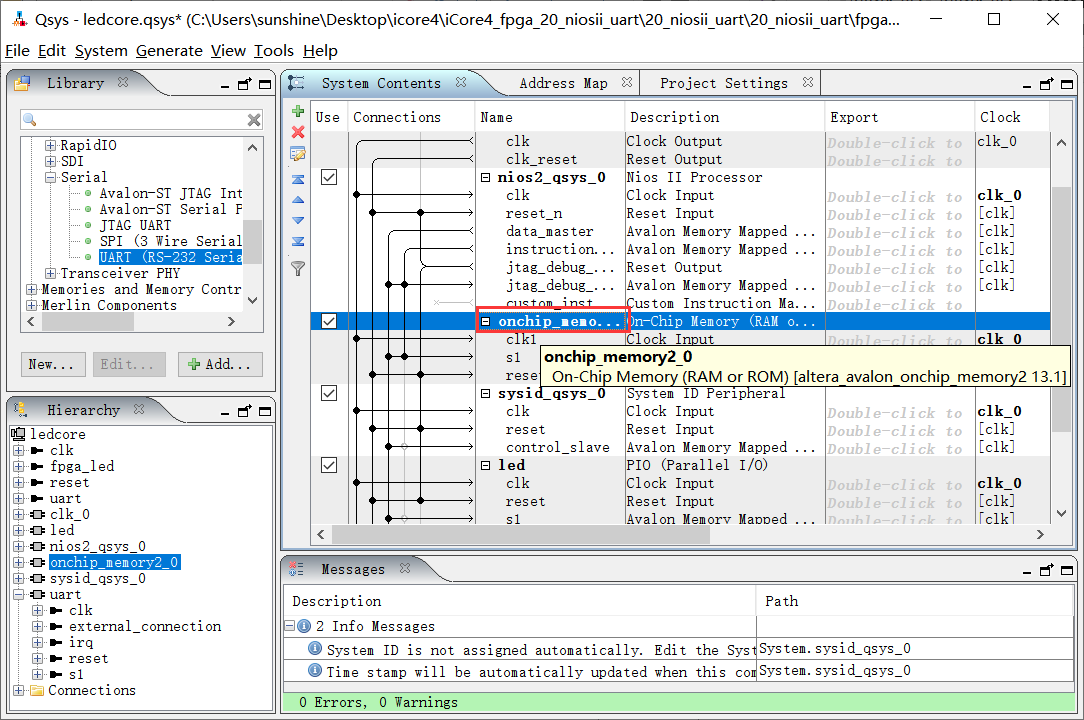
 14、程序代码较大,修改内存大小,如图所示:
 15、点击System→Assign Base Address重新分配基地址,如图所示:
 16、选择菜单栏中的Generate→Generate,重新编译:
 17、点击Generate开始编译,如图所示:
 18、直接点击关闭即可:
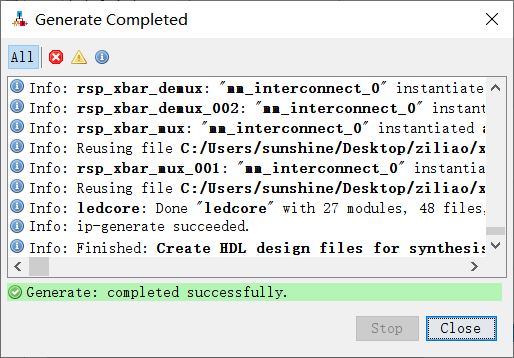 19、关闭 Qsys 窗口,回到 Quartus 主界面,如图所示:
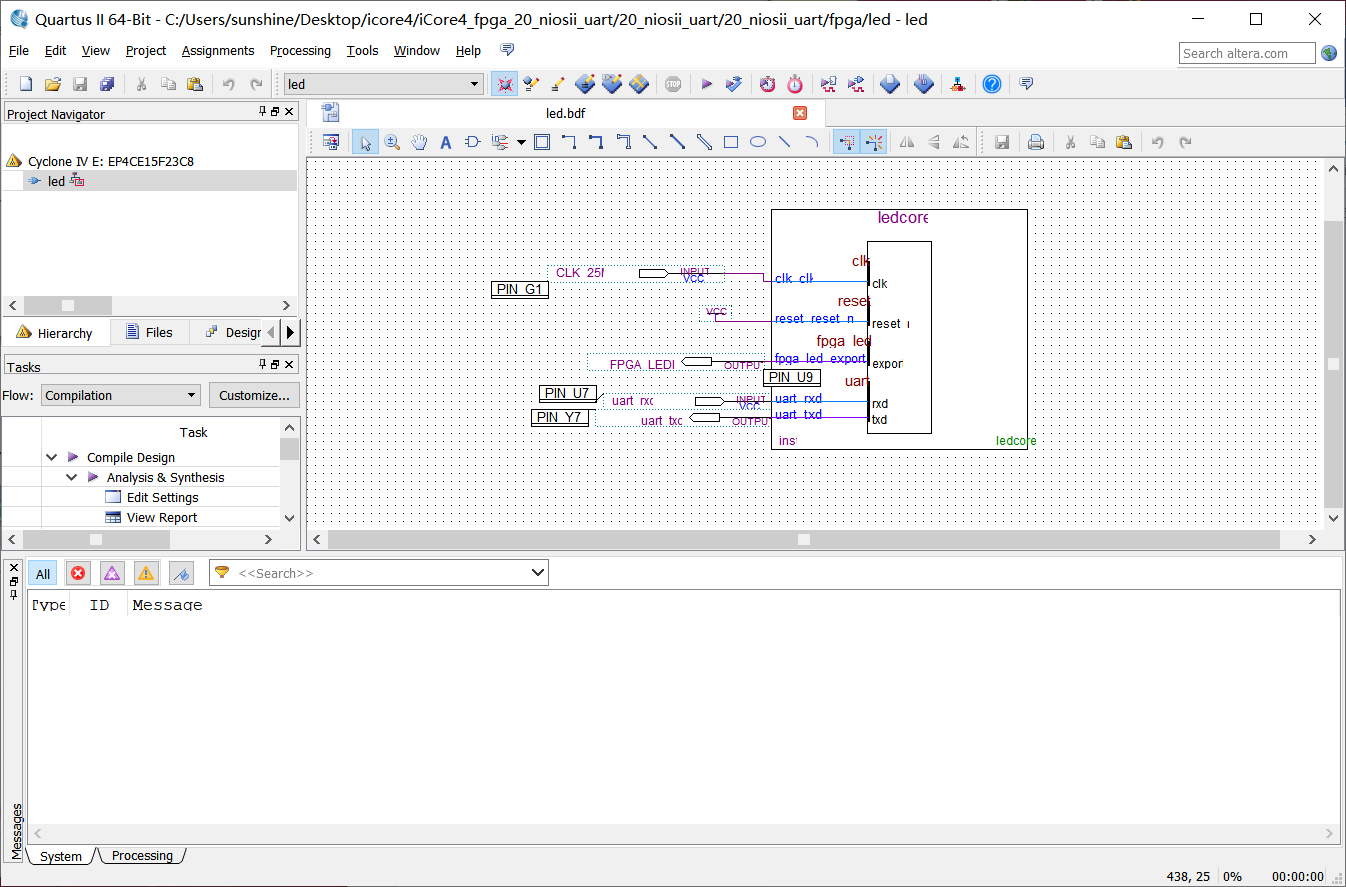 20、在此界面右击选择 Update Symbol or Block…
 21、直接点击 OK 即可。
 22、界面如图所示:
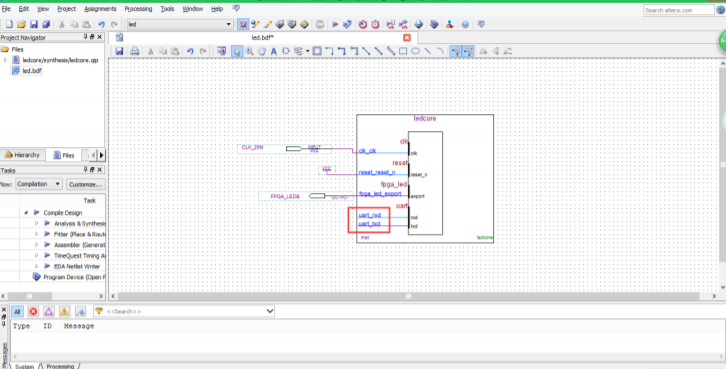 23、右击 ledcorel 模块生成引脚,如图所示 :
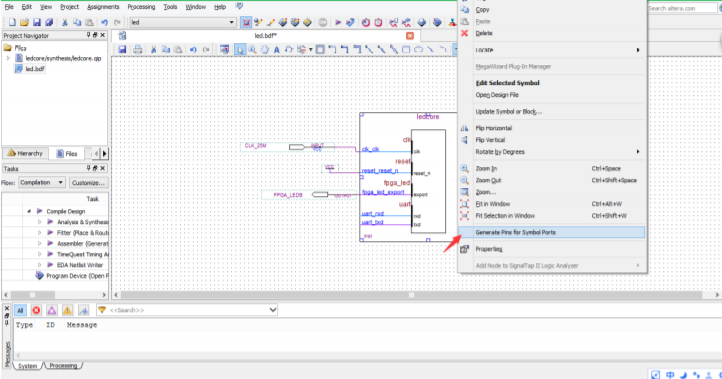 24、为串口模块端口分配引脚(建议用 tcl 文件导入的方法),如图所示 :
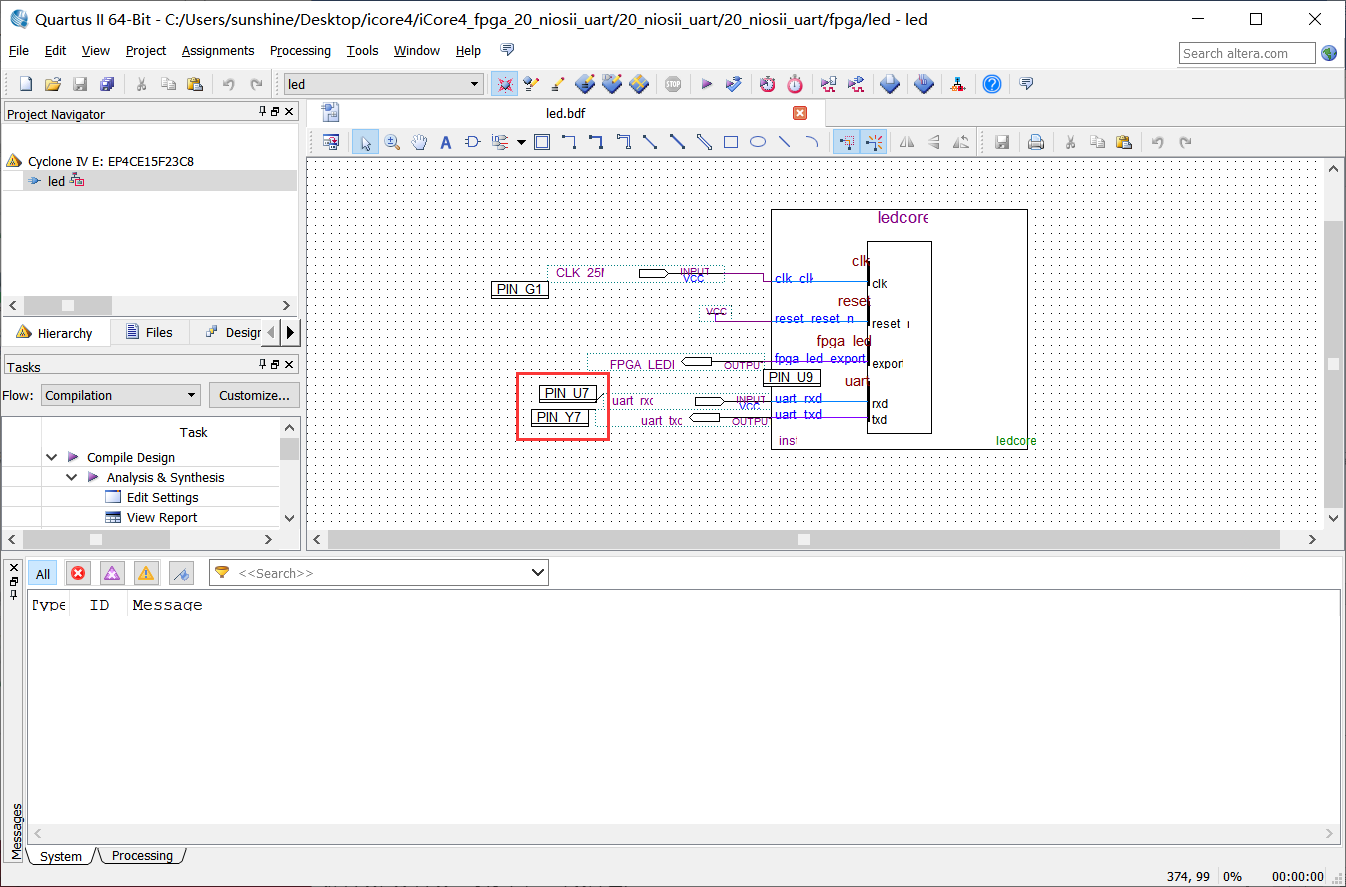 25、保存并编译工程,编译成功后硬件实现部分就完成了, 下载到 FPGA 中, 下面开 始软件部分的实现。
二、软件部分
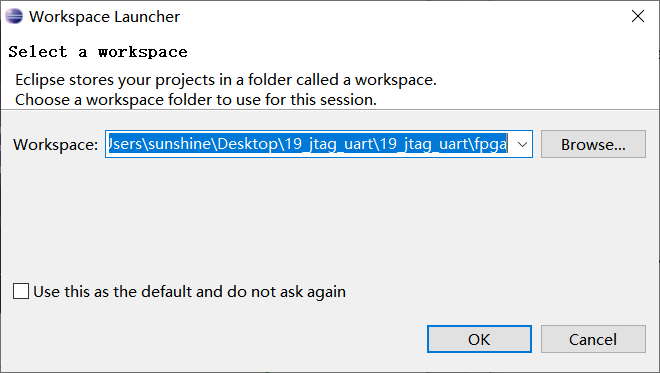
1、点击菜单栏中的 Tool→Nios II Software Build Tools for Eclipse,打开 NIOSII 软件,选 择正确的路径(与 Quartus 工程路径相同),点击 OK。
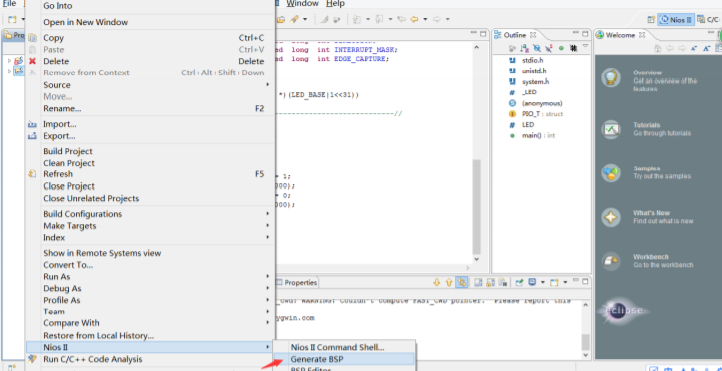
 2、选择 Generate BSP,如图所示:
 3、右击 led 选择 Update with Modified Files,如图所示:
 4、将以下代码写到 main.c 中。
/*
* FILE                                : main.c
* DESCRIPTION                         : This file is main files.
* Author                              : XiaomaGee@Gmail.com
* Copyright                           :
*
* History
* --------------------
* Rev                                  : 0.00
* Date                                 : 09/05/2012
*
* create.
* --------------------
*/
//-----------------Include files-------------------------//
#include "stdio.h"
#include "unistd.h"
#include "system.h"
#include "string.h"
#include "sys/alt_irq.h"

unsigned int receive_flag=0;
unsigned int receive_count=0;
unsigned char receive_buffer[200];
//----------------函数声明-----------------//
static int uart_send_byte(unsigned char data);
static void uart_send_string(unsigned int len, unsigned char *str);
static int uart_init(void);
static void uart_ISR(void *context);
static int set_baudrate(unsigned int baudrate);

typedef  struct {
			 volatile  unsigned  long  int DATA;
			 volatile  unsigned  long  int DIRECTION;
			 volatile  unsigned  long  int INTERRUPT_MASK;
			 volatile  unsigned  long  int EDGE_CAPTURE;
}PIO_T;

typedef struct
{
	union{
		struct{
			volatile unsigned long int RECEIVE_DATA       :8;
			volatile unsigned long int NC                 :24;
		}BITS;
		volatile unsigned long int WORD;
	}RXDATA;

	union{
		struct{
			volatile unsigned long int TRANSMIT_DATA      :8;
			volatile unsigned long int NC                 :24;
		}BITS;
		volatile unsigned long int WORD;
	}TXDATA;

	union{
		struct{
			volatile unsigned long int PE :1;
			volatile unsigned long int FE :1;
			volatile unsigned long int BRK :1;
			volatile unsigned long int ROE :1;
			volatile unsigned long int TOE :1;
			volatile unsigned long int TMT :1;
			volatile unsigned long int TRDY :1;
			volatile unsigned long int RRDY :1;
			volatile unsigned long int E :1;
			volatile unsigned long int NC :1;
			volatile unsigned long int DCTS :1;
			volatile unsigned long int CTS :1;
			volatile unsigned long int EOP :1;
			volatile unsigned long int NC1 :19;
		}BITS;
		volatile unsigned long int WORD;
	}STATUS;

	union{
		struct{
			volatile unsigned long int IPE :1;
			volatile unsigned long int IFE :1;
			volatile unsigned long int IBRK :1;
			volatile unsigned long int IROE :1;
			volatile unsigned long int ITOE :1;
			volatile unsigned long int ITMT :1;
			volatile unsigned long int ITRDY :1;
			volatile unsigned long int IRRDY :1;
			volatile unsigned long int IE :1;
			volatile unsigned long int TRBK :1;
			volatile unsigned long int IDCTS :1;
			volatile unsigned long int RTS :1;
			volatile unsigned long int IEOP :1;
			volatile unsigned long int NC :19;
		}BITS;
		volatile unsigned long int WORD;
	}CONTROL;
	union{
		struct{
			volatile unsigned long int BAUD_RATE_DIVISOR :16;
			volatile unsigned long int NC :16;
		}BITS;
		volatile unsigned int WORD;
	}DIVISOR;
}UART_ST;

#define LED		 ((PIO_T  *)(LED_BASE|1<<31))
#define UART         ((UART_ST *)(UART_BASE|1<<31))

//-----------------Function------------------------------//
int main()
{

	unsigned char buffer[30] = "Hello! I am iCore4!\n";
	uart_init();
	while (1) {
	/*蓝色led灯闪烁*/
	   LED->DATA = 1;
	   usleep(500000);
	   LED->DATA = 0;
	   usleep(500000);
	/*串口通信*/
		if(receive_flag){
			receive_flag = 0;//clear flags
			memset(buffer,0,50);// clear buffer
			strcpy(buffer,receive_buffer);//copy buffer
			uart_send_string(sizeof(buffer),buffer);
		}
		uart_send_string(sizeof(buffer),buffer);
		usleep(500000);
   }
   return 0;
}
/*
 * === FUNCTION =======================================================
 * Name                                : uart_send_byte
 * DESCRIPTION                         : 发送一个Byte
 * Author                              : XiaomaGee@Gmail.com
 * Copyright                           :
 *
 * History
 * --------------------
 * Rev                                  : 0.00
 * Date                                 : 06/05/2016
 *
 * create.
 * --------------------
 * 	=================================================================
 */
int uart_send_byte(unsigned char data)
{
	UART->TXDATA.BITS.TRANSMIT_DATA = data;
	while(!UART->STATUS.BITS.TRDY);

	return 0;
}

/*
 * === FUNCTION =======================================================
 * Name                                : uart_send_string
 * DESCRIPTION                         : 串口发送函数
 * Author                              : XiaomaGee@Gmail.com
 * Copyright                           :
 *
 * History
 * --------------------
 * Rev                                  : 0.00
 * Date                                 : 06/05/2016
 *
 * create.
 * --------------------
 * 	======================================================================
 */
void uart_send_string(unsigned int len, unsigned char *str)
{
	while(len--)
	{
		uart_send_byte(*str++);
	}
}

/*
 * === FUNCTION =======================================================
 * Name                                : uart_init
 * DESCRIPTION                         : 串口初始化
 * Author                              : XiaomaGee@Gmail.com
 * Copyright                           :
 *
 * History
 * --------------------
 * Rev                                  : 0.00
 * Date                                 : 06/05/2016
 *
 * create.
 * --------------------
 * 	=================================================================
 */
int uart_init(void)
{
	//将波特率设置为9600
	//set_baudrate(9600);

	//将控制寄存器IRRDY置1,在接收准备好后使能中断
	UART->CONTROL.BITS.IRRDY=1;
	//将状态寄存器全部清零
	UART->STATUS.WORD=0;
	//为UART注册中断
	alt_irq_register(UART_IRQ,NULL,uart_ISR);

	return 0;
}

/*
 * === FUNCTION =======================================================
 * Name                                : uart_ISR
 * DESCRIPTION                         : 串口中断服务函数
 * Author                              : XiaomaGee@Gmail.com
 * Copyright                           :
 *
 * History
 * --------------------
 * Rev                                  : 0.00
 * Date                                 : 06/05/2016
 *
 * create.
 * --------------------
 */
static void uart_ISR(void *context)
{
	//等待状态寄存器RRDY置1,当RRDY为1时表示接收的数据已经传输到RXDATA中
	while(!(UART->STATUS.BITS.RRDY));
	receive_buffer[receive_count++] = UART->RXDATA.BITS.RECEIVE_DATA;
	//接收的数据以换行符'\n'为结束标志,所以PC端的发送数据最后必须添加上'\n'
	if(receive_buffer[receive_count-1]=='\n'){
		receive_buffer[receive_count]='\0';
		receive_count=0;
		receive_flag=1;
	}
}
/*
 * === FUNCTION =======================================================
 * Name                                : set_baudrate
 * DESCRIPTION                         : 设置波特率
 * Author                              : XiaomaGee@Gmail.com
 * Copyright                           :
 *
 * History
 * --------------------
 * Rev                                  : 0.00
 * Date                                 : 06/05/2016
 *
 * create.
 * --------------------
 * 	=================================================================
 */
int set_baudrate(unsigned int baudrate)
{
	UART->DIVISOR.WORD=(unsigned int)(ALT_CPU_FREQ/baudrate+0.5);

	return 0;
}
5、右击 led 选择 Build Project 编译工程,如图所示:
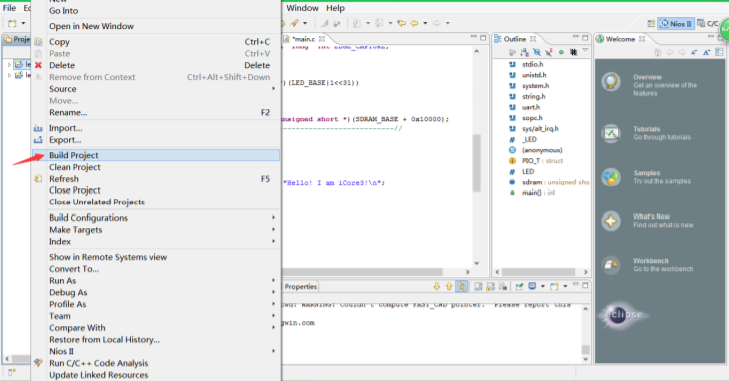 6、编译成功后会出现 led build complete,如图所示:
 7、右击 led 选择 Run As…→32 Nios II Hardware,如图所示:
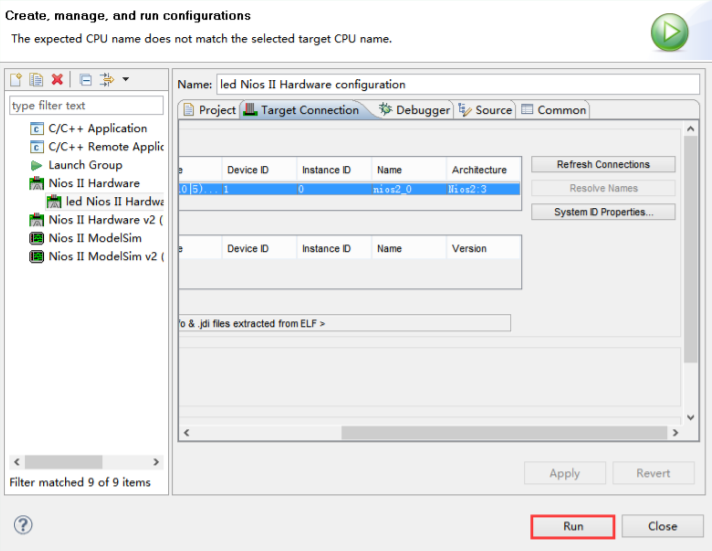
 8、可能出现如下窗口,在 Target Connection 中点击 Refresh Connections。
 9、点击 RUN
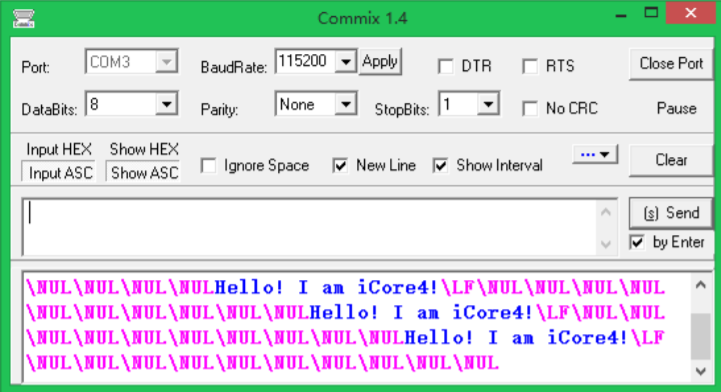
 10、成功后可以看到 FPGA 蓝色 LED 闪烁,串口助手上如下图所示:
五、 实验现象
- FPGA 蓝色 LED 闪烁,串口助手(Commix)上显示收到的数据(Hello! I am iCore4!)。
